
Creating an Optimizely CMS Addon - Adding an Editor Interface Gadget
In Part One of this series, I covered getting started with creating your own AddOn for Optimizely CMS 12. This covered what I consider to be an ideal solution structure, best practices for your JavaScript and Styles, extending the menu interface and authentication. In Part Two, I will be covering adding an additional editor interface gadget. You can view examples from across this series within the this Optimizely AddOn Template that I have been creating.
You can easily turn a standard MVC Controller into a CMS Editor Gadget by decorating it with the [IFrameComponent] attribute. The primary properties of the attributes are as follows:
- Title : The name of the gadget, visible in the Gadget selector.
- Description : A brief description of the gadget, also visible in the Gadget selector. It is recommended to keep this to one sentence.
- Categories : The appropriate category for the gadget. For content-specific gadgets, this should be set to "content" or "cms"
- Url : The route corresponding to your controller action.
- PlugInAreas : The location within the system where the component should be made available.
- ReloadOnContextChange : Enables the UI to reload the gadget each time a different content item is selected within the CMS interface.
Optimizely will automatically identify these controllers and use the properties of the [IFrameComponent] attribute to populate the Add Gadgets window within the CMS Editor interface:

When the editor interface loads your gadget, it will include an id query string parameter containing a versioned content reference in string format (e.g., 123_456). The number on the left represents the permanent identity of the content, while the number on the right denotes the specific version of that content item. This information can be used to load the specific version of a content item and incorporate it into your gadget's model.
Below is an example of the minimum required setup for your controller. Note the inclusion of the [Authorize] attribute on the controller and the [HttpGet] attribute on the action. These ensure that the user is authenticated and that the interface cannot be accessed using an unexpected HTTP verb. Note how I use the id query string parameter to load the specific version of the page the user has selected within the CMS Editor interface to provide context specific information to the user.
[Authorize(Policy = OptimizelyAddOnConstants.AuthorizationPolicy)]
[IFrameComponent(
Url = "/optimizely-addon/gadget/index/",
Title = "Example Gadget",
Description = "An example gadget for the CMS Editor Interface.",
Categories = "content",
PlugInAreas = "/episerver/cms/assets",
MinHeight = 200,
MaxHeight = 800,
ReloadOnContextChange = true)]
public sealed class GadgetController : Controller
{
private readonly IContentLoader _contentLoader;
public GadgetController(IContentLoader contentLoader)
{
_contentLoader = contentLoader;
}
[HttpGet]
[Route("~/optimizely-addon/gadget/index")]
public IActionResult Index()
{
var model = new GadgetViewModel
{
Page = GetPageData(Request),
ContentId = Request.Query["Id"].ToString()
};
return View("~/Views/OptimizelyAddOn/Gadget/Index.cshtml", model);
}
private PageData? GetPageData(HttpRequest request)
{
var contentReferenceValue = request.Query["Id"].ToString() ?? string.Empty;
if (string.IsNullOrWhiteSpace(contentReferenceValue))
{
return null;
}
var contentReference = new ContentReference(contentReferenceValue);
if (_contentLoader.TryGet<PageData>(contentReference, out var pageData))
{
return pageData;
}
return null;
}
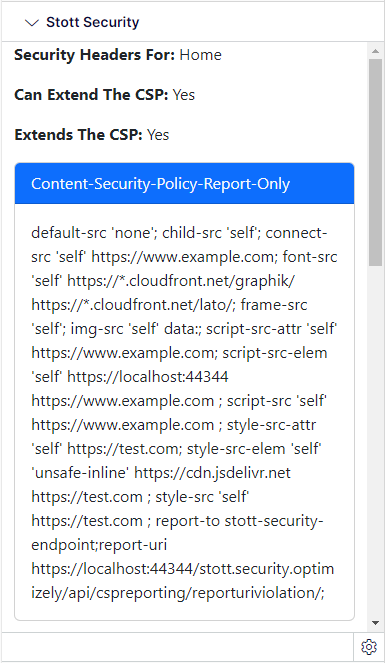
}In the gadget I developed for Stott Security, I focus exclusively on rendering a preview of the security headers for the currently selected page. I added this feature as Stott Security supports extending the Content Security Policy for any given page. To ensure the user can be clear on the context for the header preview, I load the page using the same helper method and add it to the view model for my Gadget.
Extending IFrameComponent
When your user logs into the CMS, they will be given your new Gadget by default. Now you can ensure that only specific roles have access to the Gadget by setting the AllowedRoles property within the [IFrameComponent] declaration. If your AddOn allows the developer to define a custom security policy for accessing your module, you cannot simply specify the roles within the attribute. For next version of the Stott Security AddOn, I have created a SecureIFrameComponentAttribute that inherits the IFrameComponentAttribute and dynamically resolves the roles that are allowed access to the Gadget based on that security profile.
[AttributeUsage(AttributeTargets.Class)]
public sealed class SecureIFrameComponentAttribute : IFrameComponentAttribute
{
    public SecureIFrameComponentAttribute() : base()
    {
        try
        {
            var authorizationOptions = ServiceLocator.Current.GetService(typeof(IOptions<AuthorizationOptions>)) as IOptions<AuthorizationOptions>;
            var policy = authorizationOptions?.Value?.GetPolicy(CspConstants.AuthorizationPolicy);
            var roles = policy?.Requirements?.OfType<RolesAuthorizationRequirement>().ToList();
            var roleNames = roles?.SelectMany(x => x.AllowedRoles).ToList() ?? new List<string> { Roles.WebAdmins, Roles.CmsAdmins, Roles.WebAdmins };

            AllowedRoles = string.Join(',', roleNames);
        }
        catch(Exception)
        {
        }
    }
}
Telling the CMS Editor Interface About Our AddOn
There are two steps to enable the Editor Interface to recognize our AddOn. The first step is to declare our assembly in a module.config file. Personnally this doesn't feel like it should be a requirement as all of the information is provided in the [IFrameComponent] attribute, though it appears that a validation during application startup mandates that this configuration file exists. I suspect this is a requirement tied to much deeper integrations with the UI. E.g. custom DOJO editor code etc.
Below is an example of a module.config file. Note the inclusion of an Authorization Policy as an attribute of the module node; this should correspond to the policy required by your AddOn. Additionally, ensure that the full name of the assembly containing your gadget is listed within the assemblies node.
<?xml version="1.0" encoding="utf-8" ?>
<module loadFromBin="true" clientResourceRelativePath="" viewEngine="Razor" authorizationPolicy="MyAddOn:Policy" moduleJsonSerializerType="None" prefferedUiJsonSerializerType="Net">
  <assemblies>
    <add assembly="MyAddOnAssemblyName" />
  </assemblies>

  <clientModule>
    <moduleDependencies>
      <add dependency="CMS" />
    </moduleDependencies>
  </clientModule>
</module>
If you are simply adding a gadget to a specific Optimizely CMS build, the assembly declaration can be included in the module.config file located at the root of your website application. However, in the context of an AddOn, this declaration should be placed within a protected modules folder, using a path such as [MyCmsWebsite]/modules/_protected/[MyAddOn]/module.config. There are some extra steps required to achieve this when creating a NuGet package and I address these in Part Three of this series which is focused entirely on the NuGet package process.
The second step that is needed to inform the CMS of our AddOn is to ensure that is included within the ProtectedModuleOptions. This can be achieved within a service extensions method that you call within your startup.cs as follows:
public static class OptimizelyAddOnServiceExtensions
{
    public static IServiceCollection AddOptimizelyAddOn(this IServiceCollection services)
    {
        services.Configure<ProtectedModuleOptions>(
            options =>
            {
                if (!options.Items.Any(x => string.Equals(x.Name, "MyAddOnAssemblyName", StringComparison.OrdinalIgnoreCase)))
                {
                    options.Items.Add(new ModuleDetails { Name = "MyAddOnAssemblyName" });
                }
            });

        return services;
    }
}
Summary
- Add the
[IFrameComponent]attribute to your controller to define the gadget for the CMS Editor Interface. - Add the
[Authorize]attribute to your controller to secure it. - Add HTTP verb attributes such as
[HttpGet]to your controller actions to prevent unexpected access attempts. - Add a
module.configfile to the[MyCmsWebsite]/modules/_protected/[MyAddOn]/module.configfolder so that CMS can validate your gadget assembly.
Comments