
Extends order status in Episerver Commerce
The purpose of the blog to create a new custom order status into the Episerver commerce and display that order status into commerce manager area for purchase order.
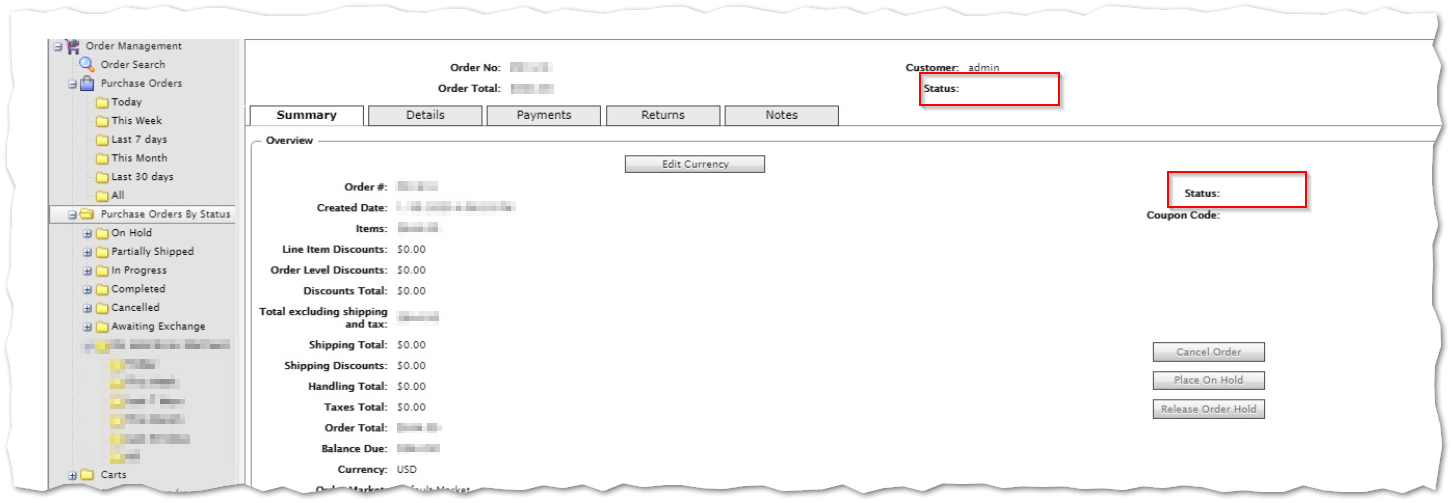
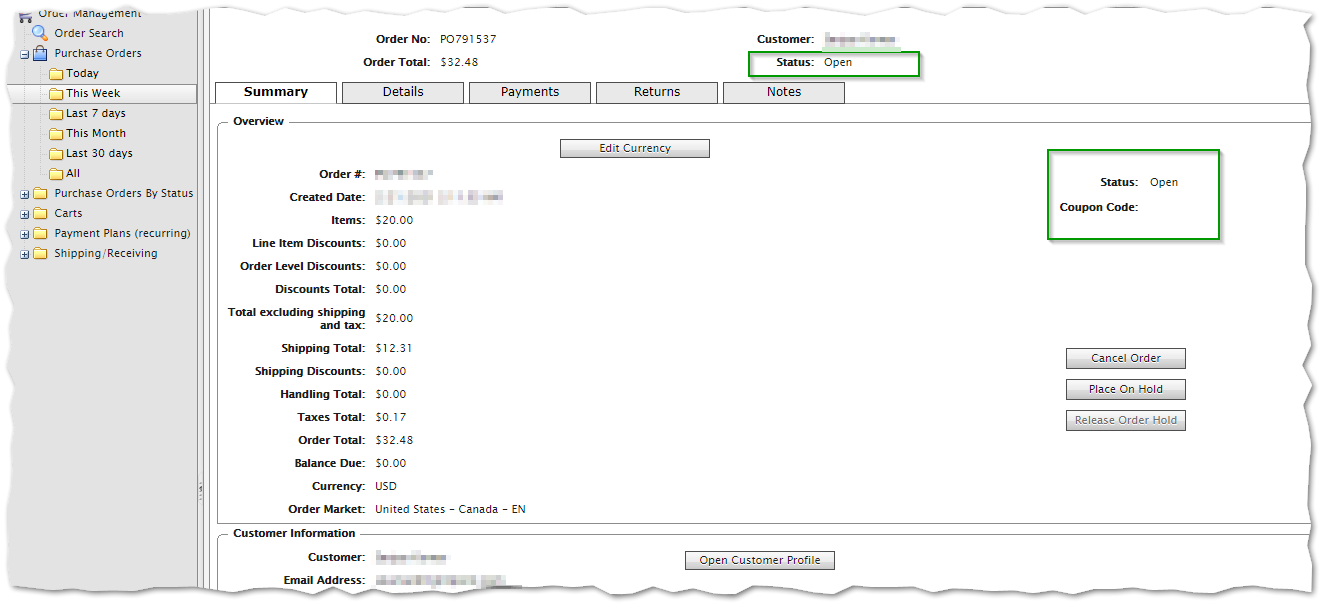
Typically, EPiServer commerce provides some default order status e.g., OnHold, PartiallyShipped, InProgress, Completed, Cancelled and AwaitingExchange but in one of my project we need to create a new order status with the name of ‘Open’ and display that order status into commerce area after the order submit or convert from cart to purchase order (_orderRepository.SaveAsPurchaseOrder(cart)).
Note: The extendable order status is available in Episerver Commerce Version 13
Ticket Reference:
The same issue has been reported in this ticket.
Okay, So let's solve the problem with help of below steps...
Step 1: Create an order status custom helper class.
public static class OrderStatusCustom
{
  public static readonly OrderStatus Open = new OrderStatus(1001, "Open");
}
Step 2: Register the new order status into Episerver commerce initialization process.
    [InitializableModule]
    [ModuleDependency(typeof(EPiServer.Web.InitializationModule))]
    [ModuleDependency(typeof(EPiServer.Commerce.Initialization.InitializationModule))]
    public class CustomOrderStatusInitialization : IInitializableModule
    {
        public void Initialize(InitializationEngine context)
        {
           var customOrderStatus = OrderStatusCustom.Open;
            OrderStatus.RegisterStatus(customOrderStatus);
        }
    }
Step 3: Set the custom order status for the purchase order and save it on the order submit action.
var orderRepository = ServiceLocator.Current.GetInstance<IOrderRepository>();
var po = _orderRepository.Load<IPurchaseOrder>(orderLink.OrderGroupId);
po.OrderStatus = OrderStatusCustom.Open;
orderRepository.Save(purchaseOrder);
From the step 1 to 3 we have changed the purchased order status from 'InProgress' (default) to 'Open'. Now times to display the custom order status in the commerce manager for the purchase order detail and list.
Step 4: Add the order status string into the listed localization files in the format OrderStatus_[CustomOrderStatusName]
- App_GlobalResources\Orders\OrderStrings.resx
- App_GlobalResources\SharedStrings.resx e.g.
Key: OrderStatus_Open
Value: Open
Step 5: The order status display process in commerce area is like a hacking process where we need to change some existing files and place their own code.
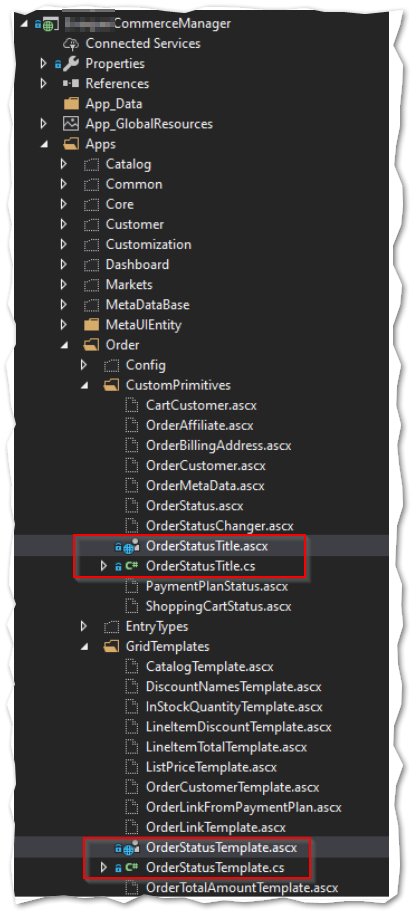
- Include the /Apps/Order/CustomPrimitives/OrderStatusTitle.ascx & /Apps/Order/GridTemplatesOrderStatusTemplate.ascx files into the CommerceManager project.
- Create OrderStatusTitle.cs and GridTemplatesOrderStatusTemplate.cs file and replace the code.
OrderStatusTitle.cs
public class OrderStatusTitle : UserControl, IFormDocumentControl
{
        protected Label Label8;
        protected Label lblOrderStatus;
        protected Label Label1;
        protected Label lblCouponCode;

        public void LoadControlValues(object Sender)
        {
            IOrderGroup orderGroup = (IOrderGroup)Sender;
            if (orderGroup == null)
                return;

            var status = (string)this.GetGlobalResourceObject("OrderStrings", typeof(OrderStatus).Name + "_" + ((OrderGroup)orderGroup).Status);
            if (string.IsNullOrEmpty(status))
            {
                status = (string)this.GetGlobalResourceObject("OrderStrings", typeof(OrderStatus).Name + "_" + OrderStatusManager.GetOrderGroupStatus(orderGroup));
            }
            this.lblOrderStatus.Text = status;
        }

        public void SaveControlValues(object Sender)
        {
        }
    }
GridTemplatesOrderStatusTemplate.cs
public class OrderStatusTemplate : Mediachase.Commerce.Manager.Apps.Order.GridTemplates.OrderStatusTemplate
{
        protected void Page_Load(object sender, EventArgs e)
        {
            string str1 = this.DataItem is DataRowView ? "" : "[undefined]";
            string str2 = string.Empty;
            IOrderGroup dataItem = this.DataItem as IOrderGroup;
            if (dataItem != null)
            {
                str1 = (string)this.GetGlobalResourceObject("OrderStrings", typeof(OrderStatus).Name + "_" + ((OrderGroup)dataItem).Status);
                if (string.IsNullOrEmpty(str1))
                {
                    str1 = (string)this.GetGlobalResourceObject("OrderStrings", typeof(OrderStatus).Name + "_" + OrderStatusManager.GetOrderGroupStatus(dataItem));
                }

                List<string> source = new List<string>();
                if (dataItem is IPurchaseOrder purchaseOrder)
                {
                    if (purchaseOrder.HasAwaitingStockReturns())
                        source.Add((string)this.GetGlobalResourceObject("OrderStrings", "OrderStatus_HaveAwaitingStockReturns"));
                    if (purchaseOrder.HasAwaitingReturnCompletable())
                        source.Add((string)this.GetGlobalResourceObject("OrderStrings", "OrderStatus_HaveAwaitingReturnCompletable"));
                    if (source.Count<string>() > 0)
                        str2 = "(" + string.Join(",", source.ToArray()) + ")";
                }
            }
            this.label1.Text = str1;
            if (string.IsNullOrEmpty(str2))
                return;
            this.divAdditionalStatus.Visible = true;
            this.label2.Text = str2;
        }
}- Now open the OrderStatusTitle.ascx file and change the 'XXXXXXX' Inherits from the qualified namespace of commerce project e.g. QuickSilver.Commerce.Apps.Order.CustomPrimitives.OrderStatusTitle
<%@ Control Language="C#" AutoEventWireup="true" CodeBehind="OrderStatusTitle.ascx.cs" Inherits="XXXXXXX.Apps.Order.CustomPrimitives.OrderStatusTitle" %>
- Repeat the same process for GridTemplatesOrderStatusTemplate.acsx
RESULT :
Purchase order List:

Purchase order Detail:
Enjoy the coding and share your thoughts 😊
Thanks for your visit!
Nice write up Sanjay 👍
Thank you Drew!